The Nissan Club banner

How To: Stereo Installation

107K views 26 replies 13 participants last post by  CHiP  
#1 ·
I know there has been a few stereo installation write-ups, but I also took a couple of pictures while installing mine (6 months ago), and thought another quick write-up may be helpful to some. Like I said, It has been a while since I installed it, so I will try to do my best to remember the steps in the install. I made my purchase from crutchfield, so it came with a quick guide, and factory stereo installation kit.

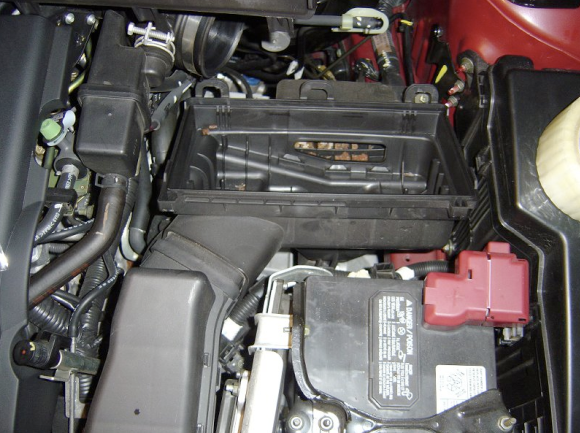
1. First, to begin with, like with any other electrical install, disconnect the negative battery terminal to prevent any accidental short circuits.
Image

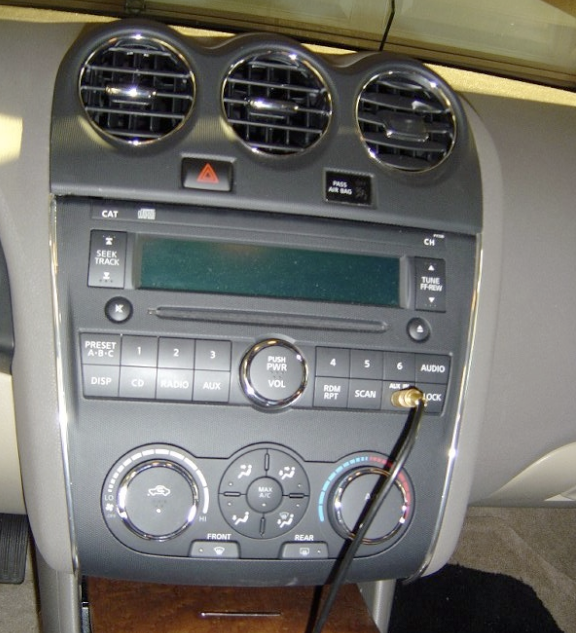
2. Remove the trim panel under the climate control panel simply by pulling it down, and it will expose 2 Phillips screws.
Image

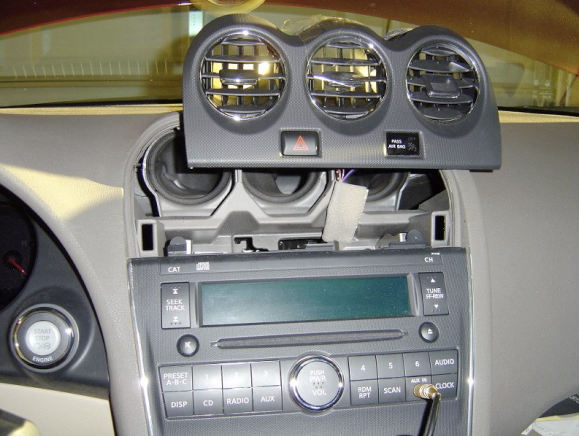
3. Now remove the vent trim panel above the radio by carefully using either a panel removal tool or a flathead screwdriver. I pried out about a inch from the bottom of the vents on the sides using a flathead screw driver. (You may want to have a thin towel there to prevent scratching up the dash). You can now place the vents on top of the dash, and place a book or something on them to hold them up there.
Image

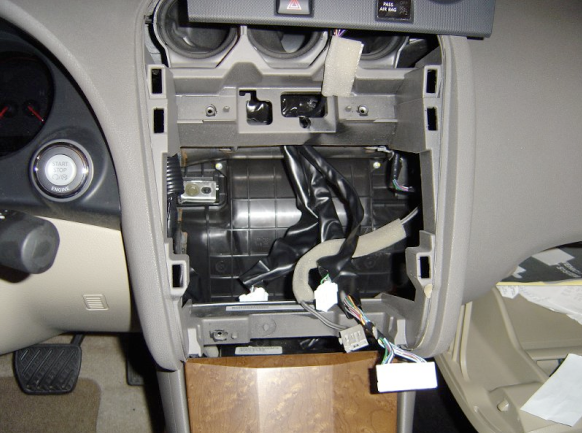
4. Now remove the 4 Phillips screws from the dash. ( 2 which were exposed from under the climate control, and 2 which were exposed after removing the vents)
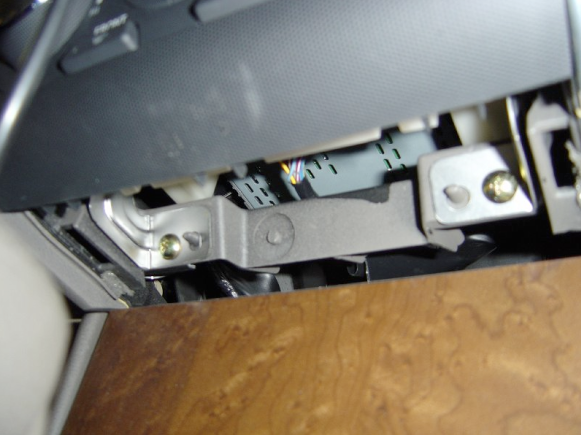
5. Pull the factory stereo out, as one piece, and unclip/unplug all of the wiring harnesses attached to the radio/climate control.
Image

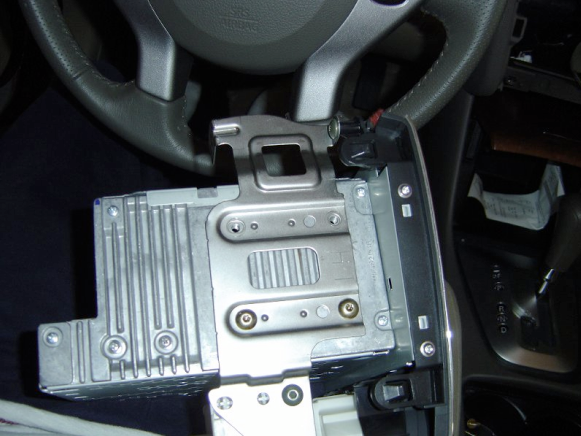
6. Remove the 5 Torx Screws securing the radio/climate control on each side, and then remove the factory climate control to reuse in the stereo installation kit you have purchased.
Image

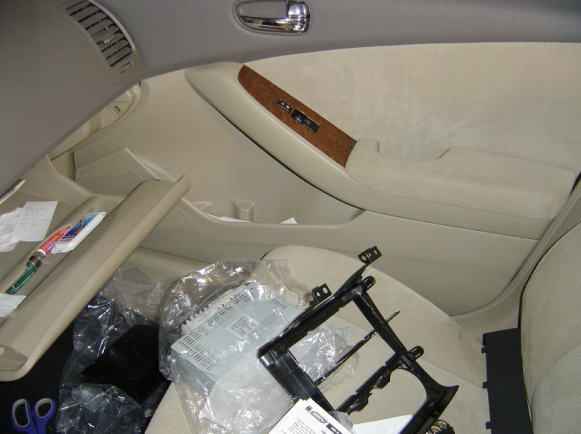
7. Clip the correct climate control trim panel into the radio housing kit (depending on if you have auto or manual climate control.
Image

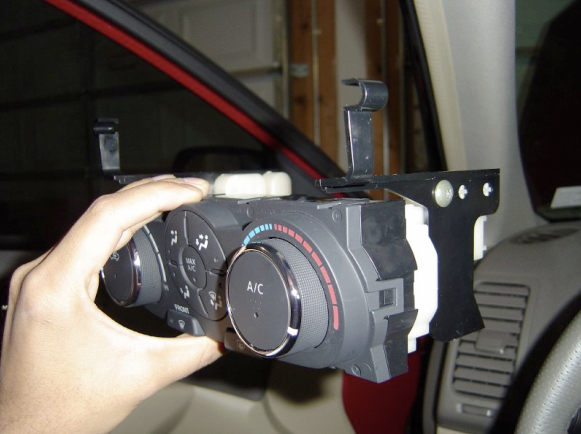
8. Attach the 2 brackets provided with the kit to the climate control using the factory screws, and then attach the bracket
Image

9. Slide the DIN cage into the radio housing kit, and then slide the aftermarket radio into the cage until it snaps into place. Then slide the pocket underneath the aftermarket radio and snap it into place.
10. With the purchased Nissan wiring adapter harness, and the wiring harness provided with the aftermarket radio, solder or crimp the corresponding wires together following the guide. Tape any unused wires off.
11. Connect the Nissan wiring adapter harness to the Nissan factory harness, and from the Nissan wiring adapter harness connect the stereo wiring harness to the stereo. Then connect the factory climate control wiring harness back to the climate control, and also the purchased antenna.
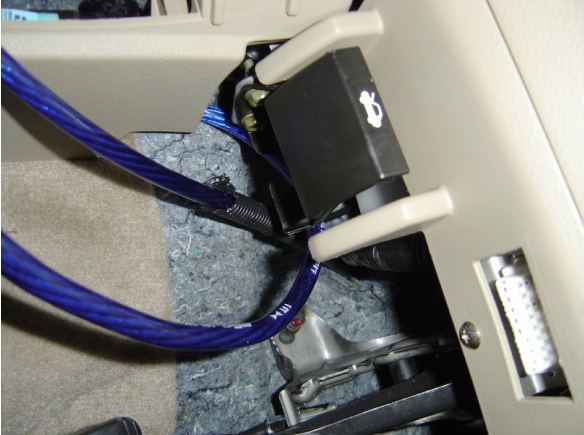
12. Connect the ground wire with a bolt to a existing hole on the frame of the car.

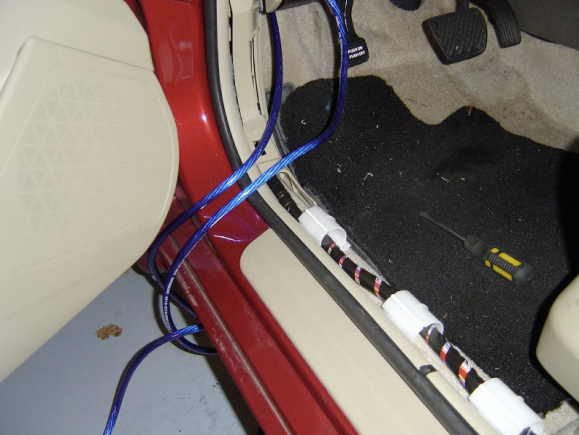
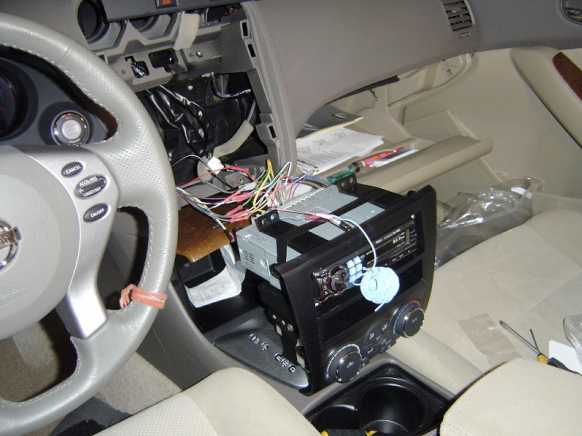
IF your also adding an amplifier and subwoofers to your system, connect the signal cable and RCA cables to the back of the stereo at this time and have them run down into the passengers side footwell.
Image

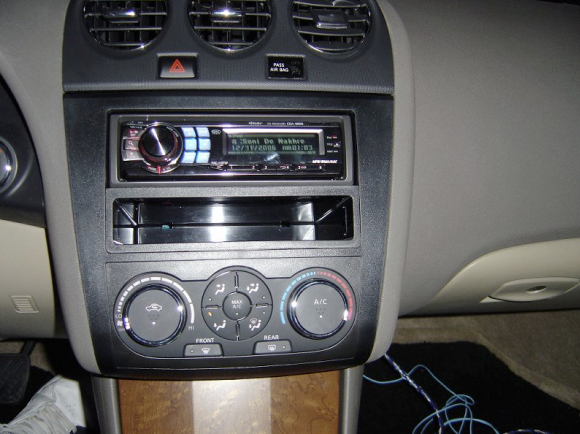
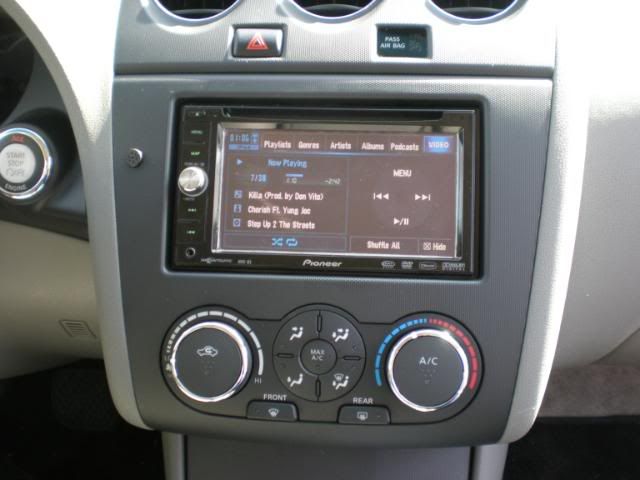
13. Place the entire radio housing back into the dash and screw the 4 Phillips screws back into place. Carefully slide the vent trim panel back into place by pushing in gently, and snap the trim under the climate control back into place. The stereo install is now complete.
Image
 
#2 ·
Running the Power Cable from the battery terminal to the trunk
1. First, attach the power cable to the battery and then route it through the firewall. The power cable should have a fuse holder attached to it within six inches from the battery, although some power cables may contain in-house fuse holders. However, wait to place the fuse into the fuse holder until the whole installation is complete.
Image

2. To route the power cable through the firewall, the air box must be removed. This can be done by unclipping the top lid and then removing a Phillips screw to disconnect the bottom portion. Then simply push it out of the way. Now route the wire to the driver’s side and there is a gourmet located behind the wheel fender. I myself was to afraid to cut a hole in the gourmet (because I didn’t want to cut any other wires) so I went on the outside of it. Then simply pull the power cable in using a wire hanger.
Image

Image

Image

Image

Heres the rubber gourmet
Image

3. After getting the wire in through the firewall, pry off both sides kick panels, front and back, using a flathead screwdriver. Then route the power cable down the driver’s side under the kick panels and into the trunk. To prevent interference from occurring, route the signal cable and RCA cables, previously routed down into the passenger’s side foot well, under the passenger’s side kick panels into the trunk. Finally, re-install the kick panels over the routed wires. Now the wires are all ready for the amplifier and subwoofers.
Image

Image

Image

All the wires coming into the trunk
Image
 
#3 · (Edited)
4. Connect the power cable/signal cable/RCA cables to the amplifier, and ground the amplifier with a bolt to the frame of the car.
Image

5. Run the speaker wires from the amplifier to the subwoofers, and you have a new bumpin’ system!
Image


Finished Product: Subwoofers (I later decided to place the amplifier under the trunk carpet in between the spare tire to conserve space
Image


That’s the best I can do in the time I had. I still hopes it makes it a bit easier for anyone looking to replace their factory stereo in the future.

BTW: (off topic)-- but I spent over 5 hrs painting my calipers red yesterday, using only a hand jack..and wanted to show off how they look:
Image

Image
:D
 
#4 ·
Very detailed and helpful write up!

I'll add a few hints from my own 2007 Altima :

1. The OP stated it, and I'll re-emphasize: The very first step to this install is removing the negative battery cable. It is important.

2. When running your amp wire through the firewall, also pull an additional power and ground wire to connect your new deck directly to the battery. Almost all white noise in a stereo system is related to the deck and amp grounding points. It's a simple step, but it can go a long way in keeping engine noise at bay (especially if you are running a 4 channel amp for your mids and highs).

3. When grounding your amplifier, be sure to scrape all of the paint off of the grounding point. Your best bets are items that bolt to the chassis of the car. I used the rear seat belt bolts, and simply used a flathead screwdriver and wire brush to remove the paint. To get to the seat belts, you just need to remove the butt portion of the rear seat. Its tremendously easy. See the two pull rings sticking out on the front of the seat pad? Pull on the ring and pull up on each side. Now remove the seat.

4. During installation remove the faceplate from your stereo if possible. Frequently put it back on to ensure clearance, but with all the metal tools floating about, you could be asking for trouble.

5. If you don't have automatic climate controls, purchase the factory 2-din dash kit. It gives your new deck a completely factory look.

From member Sethman408:

Order it here: Nissan Parts 2 U It is part #15.

Then order this deck pocket: Universal DIN Pocket at Crutchfield.com

The OP did a great job on his install, and it turned out great, but the factory panel is like the tire shine on a freshly waxed car. It just sets it off.

For installation using the factory dash kit, you'll reinstall the climate controls and metal piece from step 6 (held on with torx screws) onto the new dash kit. You'll then screw the deck and pocket directly to the original metal piece.

From a security standpoint, the factory dash kit is far superior to the other aftermarket options that utilize the metal cage that comes with the new stereo. It takes a thief about 10 seconds to rip a deck out of the cage using some flat head screwdrivers; say adios to your stereo. A thief will steal your deck with or without a faceplate ( I have two faceplates without stereos as proof ). With the factory kit, a thief will have to remove your AC vents and lower pocket panel to expose the 4 screws shown in steps 2 and 3 of OP. This takes additional time, and that is a deterent to thieves.


BONUS Security tip: When reinstalling the factory dash kit once you've bolted on the Climate controls and new deck, go to the store and get new screws for the four screws shown in steps 2 and 3 of OP. I use screws with square inserts (commonly used in home electrical). Once I've installed the screws, I use a drill bit or allen head to strip out the head. To remove the screw you have to use pliers and it takes a while, but a thief will not bother with it.

BONUS Security tip 2x: Use these same screws for installing your amplifier. I mounted mine to the back of the passenger seat. Don't forget to strip them out.

BONUS Security tip 3x: If you place your subs against the back passenger wall like the OP did, you can actually chain them to the rear speaker deck. You don't need a monster sized chain, this is simply a deterrent. Remove the subs from the box and install an eyelet that bolts from the inside of the box. Now run a chain through the eyelet and through a few holes on the rear speaker deck. Be sure to wrap the chain in electrical tape / duct tape to eliminate rattling. Use a combination padlock to lock the chain; put the combination in your cell phone. If you use a keyed padlock, you risk losing the key; not good.


A thief will steal your stuff if they really want it. You can't stop them. These steps will certainly help to deter them though.

6. Depending on how detailed your install has been (deck, noise deadening, door speakers, remove seats, remove door panels), you might find your auto up function does not work on the driver window, and the air bag light stays on in the dashboard. Easy fixes:

Window: Roll both front windows down halfway. Now roll them up and hold the up buttons for an additional 5-10 seconds.

Air Bag Light: Turn your car off. With your foot off of the brake, turn the car to the "on" position. In the instrument cluster the airbag light will blink, as soon as it stops blinking (but before it turns on solid a moment later) turn the car off. Wait a few seconds and repeat this step 3 times.
 
#5 ·
Excellent write up! When I installed my headunit I just kinda screwed around until I got it out. I did use the factory 2 DIN plate though, I'll see if I can get pictures.
 
#6 ·
Audio noob question:

I have an '07 without navigation, bose, and with manual climate control. Are my aftermarket audio options limited to:

1) CD player with rectangular storage below ($100-$500)
2) Navigation unit w/ LCD screen that fills the entire area ($800-$1200)

That's it right? Do they sell aftermarket CD players that have an LCD screen that will fill the entire area without forking out $1000, or does LCD screen = navigation and all that other BS = $1000+-

Basically, I just want a better CD player without that storage space below it.
 
#7 ·
You have many options in that pice range. Just go onto a site like crutchfield.com, put in your year/make/model, and they'll list all of your options for you. I've seen many screens below $500
 
#9 ·
Very true. OEM dash kit is worth the money. At first I had the one in that crutchfield had provided, but I didn't like the shiny look, so I decided to replace it today. I used the factory brackets off of my factory stereo, screwed the alpine stereo directly to the brackets (perfect fit) and went down to best buy to buy a universal pocket for $20, since the one from the old kit did not fit. It also fit screwed right onto the factory brackets. Overall great look

Before
Image


After
Image
 
#13 ·
haha... yeah... OEM looks awesome... I'm pretty sure I ordered the one without nav... and its the double din one... check the FAQ section to be sure.... I think the dash kit costs about 30 bucks?

and no, I did not have to do any cutting or putting any additional plastic to get it to look like that... there is a gap... but its not that bad...

and yes, that is the Avic D3...

more pictures and stuff here.... 4th Gen Altima - Avic D3 Install - SUPERNISSANS.NET Nissan Owners Community
 
#18 ·
Nice explanation but could you mention something about the signal cable (remote turn on wire). Im wanting to add a sub to my factory unit. Im cool with everything but where and how to do the remote turn on wire to the amp. Any help, especially with pictures would be awesome. Thanks.
 
#19 ·
You can crimp the signal cable to the wiring harness, according to the wiring diagram you will get with the harness, which tells you what each wire is for, and then you can run it back to your trunk along with your RCA cables where your amplifier is. I ran mine down the passengers side, while my power cable ran down the drivers side to prevent interference.
 
#21 ·
It all depends on your AC controls. If you have Climate Control, you order for navi (although the opening is slightly wider than a standard double din and you have to fill in the gaps). If you don't have climate control but the regular AC controls, then buy the non-Navi Kit. It has a correct size double din opening for any single or double din head unit.

~SB