The Nissan Club banner

Evolution of Sound System in an '08 Altima - Build Log

29K views 55 replies 9 participants last post by  bikerider  
#1 · (Edited)
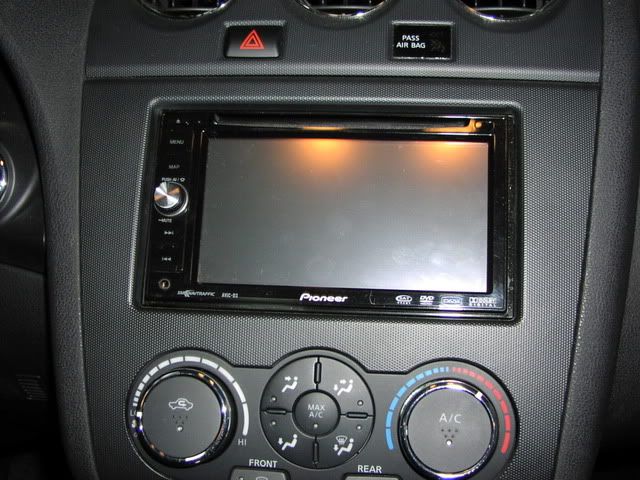
I bought my Altima in April of 2008 - 2.5S sedan with no options. Within 3 weeks the stock head unit was gone, replaced by a Pioneer AVIC-D3:

Image


Got the factory faceplate from NissanParts2U.com.

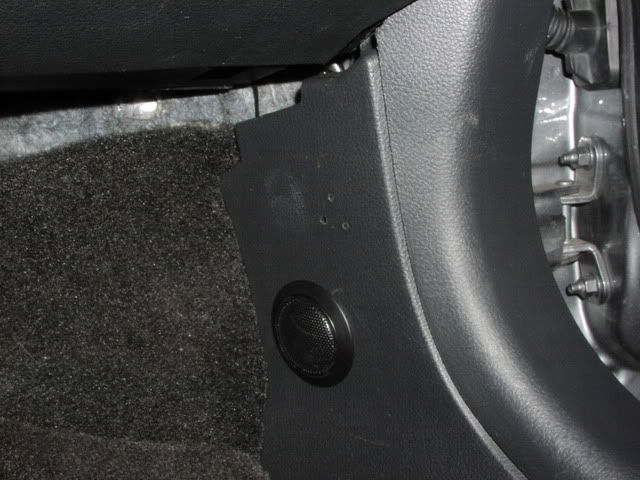
In January 2009 I added an amp (Cadence SQA-4, 60Wx4 bridged to 200WX2 @ 4 ohms) and a 6 1/2" component set (Cadence CWM-6KIT) up front. The factory dash and rear deck speakers were disconnected but stayed installed.

For the past year I have been running this set up and for the most part have been happy with the sound. But I wanted more low end - my components were highpassed at 80Hz and I wanted to fill in the lower frequencies I had been missing. So, I had a few simple goals with this project:

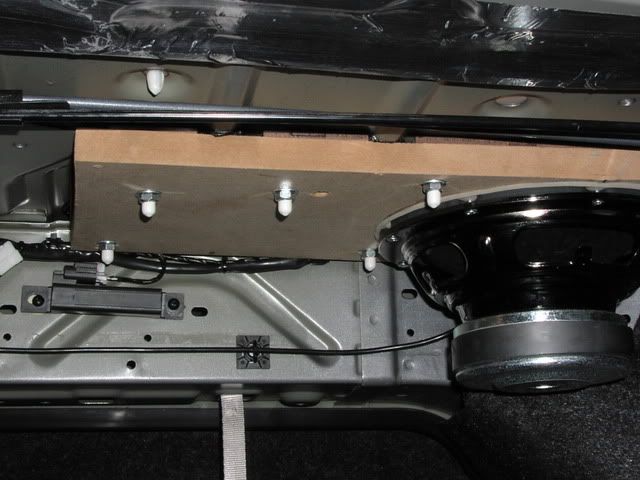
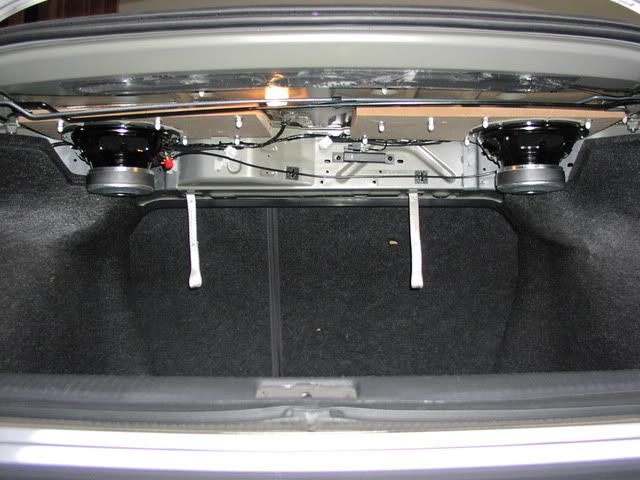
  • Fill in the missing frequencies with natural bass, no window-rattling bass for me
  • Retain ALL of my trunk space
  • Stealth install that looked completely stock to anyone who did not know specifically what I did
  • Keep the budget under control (originally <$300-ish)
 
#2 · (Edited)
My initial plan was to glass a sub enclosure INSIDE of the spare tire for a 10" subwoofer. In preparation of this I relocated my amp to the rear deck:

Image


This took the better part of a day to do - I also relocated the crossovers to the trunk and ran new speaker wires to the front. While it freed up my back seat, I didn't really like how this turned out cosmetically as I had to hang the amp much lower than I wanted to because of the torsion bars.

I also removed the 6X9's from the rear deck to create some venting for the trunk mounted sub (which I still did not have). In order to keep costs down the sub was to be driven by a bridged channel of the SQA-4 (200W @ 4 ohms), the components would get 60W per side which works fine.

Then I started trading PM's with nismos14 :)...
 
#49 ·
Very very good job on your system. Just 1 question...... Why own earth would you risk burning your car down by fusing the power wire in the trunk next to the amp?????? That fuse is NOT for the protection of the amp itself, but for the protection of your car in case of a dead short.Should be fused near the battery no more tha 18". I dont extend further than 10". Please tell me that....
1. you have a battery in the trunk
2. you also have a fuse in the engine bay
or
3. I am not seeing what it is I think I see.....
 
#3 ·
After considering how much power I had to feed the sub channel and what my goals were (and a LOT of PM's to nismos14), I made a decision to go IB. IB stands for Infinite Baffle - short definition is that the trunk is sealed off from the cabin and the subs use the trunk as the enclosure and fire into the cabin.

So, after a modest paypal to nismos14, a set of DLS W308B's were on the way (8" subwoofers). I also gave my new friend Don Sambrook at Sound Deadener Showdown - Your Source for Sound Deadening Products and Information a call and ordered some CLD tiles, closed cell foam and extruded butyl rope (more on this later) and it was game on.

First up was relocating the amp, no way it would fit where it was. The first night would be spent:

  • Cleaning up the midbass and tweeter installs in the front
  • Relocating the amp to somewhere else in the trunk
  • Cleaning up wiring from previous work
 
#4 · (Edited)
Door Work

First up was to apply some deadener (CLD - constrained layer dampener) to the front doors.

First the door card was removed (no in-process pics of that, it is detailed all over this forum anyway)

Image


I removed the midbass (note the hole at the upper left of the picture, there are 2 adhesive disks that need to be removed to access the window linkage if you are going to get inside the door to deaden)

Image


Roll the window down until you see the orange tabs of the window bolted to the mechanism - you will see a bolt in the hole

Image


There are 2 10mm bolts (1 per hole) that need to be removed. Once these are out grab the window (now free of the linkage) and pull it up as far as you can. Use tape looped over the door frame to hold the glass in place while you work (sorry no pic of this)

Now you can remove the inner panel, remove the 10 outer bolts as shown below

Image


Do NOT remove any other bolts as they hold the motor and window track to the panel and in doing research about this removing any more bolts resulted in many hours of work putting stuff back together.

Once the bolts are removed, pull the panel away and up from the door, it is well sealed to the rest of the door with a nice sticky foam gasket from the factory. Here is what you will see

Image


I applied 2 6"X10" CLD tiles to the outer door skin, one in the upper center and another behind the midbass driver. Sorry, did not take pics. When I have the funds to do so I will go back in and cover the entire outer skin with a layer of closed cell foam and MLV (Mass Loaded Vinyl) to soundproof the door. However, what I did here made a big difference as far as reducing the resonance of the door panel.

Reinstalled the window track panel with some CLD on some of the spots that sounded a bit hollow when I knocked on them. I also applied CLD to the inside of the door card under the window switches and behind the cup holders to stop a lot of the resonance from this panel.

Image


On to the actual speakers next.
 
#44 ·
Roll the window down until you see the orange tabs of the window bolted to the mechanism - you will see a bolt in the hole

Now you can remove the inner panel, remove the 10 outer bolts as shown below

Image


Do NOT remove any other bolts as they hold the motor and window track to the panel and in doing research about this removing any more bolts resulted in many hours of work putting stuff back together.

...sooooo...you know those dumbasses who dont pay attention to instructions...well, i should be raising my hand and shaking my head.

I read this thread a few weeks ago, saved it just because I knew it was time to deaden inside the door skin...
got out to my car, and thought of your how to....decided I would be fine without it.
Then my dumbasss pulled out those "do not remove window track bolts." took me 10 minutes to get it back together..."WHEW"....and now my window is slightly slower than the drivers side...I need to go back and fix it this week when I get time. it works, but not like Id like. FML.
 
#5 · (Edited)
Front Stage Speakers

2 goals here - solidify the mounting of the midbass drivers and locate the tweeters to their final install spot.

First up was the midbass - as seen in previous pictures it's mounted to a 1" MDF baffle and was bolted to the door using the factory bolts. I wanted to get this nice and sealed up/decoupled from the door to improve the midbass response. So out came the extruded butyl rope

Image


This stuff is pure butyl (same stuff used in all of the premium dampening tiles/sheets available) and can be stretched to make it thinner if needed, I think it is 3/8" as shown here. It is super sticky and was applied to the back side of the baffle to seal it to the door panel. Just unroll and press onto the back of the baffle. This helps to seal the baffle to the door but more importantly takes care of any vibration.

Sandwiched between the driver and the baffle is simple foam weatherstripping

Image


Image


And mounted - you can see where the butyl is squeezed by the baffle.

Image


Up last was the tweeters. I had experimented with them in 3 locations: in the factory dash locations (imaging issues and reflections from the windshield), flush mounted in the kicks and angle mounted in the kicks. Of these I liked the flush mount the best as these tweeters really shine off-axis. A bit of EQ boost around 2K and reversing the polarity on the tweets brings the stage height up pretty well. Pic is of passenger side, but both sides are the same including the holes left by the angle mounts I used. One day I'll spend the $20 for new kick panels.

Image


OK, on to the trunk. I started the "new" work at about 6PM and by now it was almost 9PM so I needed to get going...
 
#6 ·
Moving the amp

This seemed like it took the most time of anything. But to be fair I took the entire back seat out to organize all of the wire in loom and make sure it was tidy which took a TON of time.

Here is where the amp is going:

Image


To make the best (shortest) ground possible, some work was needed

Drill a hole and remove paint

Image


Install a stainless steel bolt for a ground lug

Image


Now came a problem. I had visualized using the spare tire bolt as a mount for the amp (fitting inside of an inverted spare tire), but when I measured I was way off, the amp at 11X13 was too big. So one of my unspoken goals (no cutting the car up) was about to be violated.

Out comes the air saw

Image


Spare tire mount gone in like 10 seconds, problem solved

Image


The remaining metal was ground down and coated with Plasti-Dip to avoid any wire chafing.

A box was made (using scrap wood & MDF I had laying around) for the amp and it was mounted to the trunk with screws from below. Also mounted two eye bolts used to hold the spare down. Not as neat as I would have liked, but no one will ever see it. I may rebuild this box in the future to have less height, but it came out OK for now.

Image


Using a posterboard template, I got the shape of the false floor that would sit on top of the amp and provide support for the spare tire. A few minutes with a jigsaw on 1/4" hardboard and we had this

Image


All that was left to do was put the spare in and secure it. Good thing because by now it was 2:30 AM and my garage was a mess plus I had to work the next day.

Image


Had to remove the foam blocks from this board

Image


Image


By time I got the garage cleaned up it was 3AM. Thankfully the next day was Christmas Eve and not a whole lot goes on at work.

Next up, let's install some subs!
 
#7 ·
Sub Install Time

This part took a long time. The original plan was to mount a 3/4" MDF baffle board that would span the entire underside of the rear deck and would be bolted directly to the metal. But, a lot of time upside down looking at things revealed a few challenges

  1. The rear deck is far from flat, no way that I could get good contact between the baffle and the deck all the way across
  2. The 6x9 holes had a large lip on them that would need to be cut away

I had toyed with the idea of cutting the rear deck to make 7" round holes for the subs, but after looking at this I decided it wouldn't be worth it. In any case, I decided to go with separate left/right baffles instead of a continuous one.

So Step 1 was to make some templates (also shown is the template for the spare tire well)

Image


Image


The sub baffles would be 2 piece, 1/4" hardboard shaped to fit the deck, then 3/4" MDF glued to that for a 1" thick baffle. The hardboard fits all of the irregular curves of the rear deck as well as the speaker hole lip. Here is the driver side one waiting for the glue to dry. Driver's side definitely was harder because it had more shapes and wiring harnesses to deal with.

Image


Having a router and jigsaw definitely helped here.

Once the baffles were glued up, lots of test fitting happened to make sure they would fit. Before final mounting holes were drilled thru the baffle and the rear deck metal for thru-bolting. The driver side baffle is secured by 6 1/4" bolts, the passenger side by 7. A ton of extruded butyl rope was applied between the baffle and the rear deck for dampening. This stuff sticks so well I could remove all of the bolts and the baffle doesn't move. On to the mounted drivers:

Driver side - here closed cell foam was attached (contact cement) to the baffle for a speaker gasket

Image


Passenger side

Image


Between the speakers

Image


Overall view

Image


Image


I applied the remainder of my CLD tiles to the topside of the rear deck, mostly where the baffle wasn't bolted on. Also applied to the underside of the rear deck cover. I have a bunch of closed cell foam that I will use as needed to quiet any rattles that I hear.
 
#24 ·
Driver side - here closed cell foam was attached (contact cement) to the baffle for a speaker gasket

Image


Passenger side

Image
Bikerider, on top of both pics i can see u applied some deadener. Those holes are pretty big all across the trunk, did u cover them with metal first or just layed deadener right on top of the holes?
What covering them really needed??
 
#8 ·
Configuration and Impressions

Front components are HPF'd from the head unit at 80Hz. Subs are LP'd at 80Hz, I'm also using a 30Hz subsonic filter on them to protect them from damage.

Subs are wired in series (using Radio Shack cheapo 12g hook up wire which works great, cost $8 or so because I bought a red roll and a black roll to look professional :)) presenting an 8 ohm load to the SQA-4. Each sub gets 100W. Good thing about the 8 ohm load is that the amp doesn't even get warm.

Still playing around to get them dialed in and also letting them break in, but so far I would say mission accomplished, I am quite pleased with the results. These do a good job of smoothly filling in the lower frequencies I was missing and the bass is "up front", you can't tell it is coming from behind you. Best I can describe it is that it sounds/feels like the midbasses are taking care of everything. This definitely isn't a thumping bass effect, it blends in nicely and provides the sound quality I was looking for.

I haven't heard any noise from the rear deck except for the initial tuning/gain setting when I pushed the subs far harder than I ever would in normal listening and got a few minor buzzes. One day I will go in and line the entire rear deck with CCF.

Best part - I showed my wife and got this response: "So what? You pulled me out into a cold garage to show me your trunk? I can't believe you spent all this time out here and everything looks the same as before!". Perfect.

Sorry if I didn't get all the pictures I could have, at some points I got into a rhythm and wasn't going to stop to get the camera out. Hopefully this helps someone.

Big thanks to nismos14, he is a class act and we are lucky to have him on this forum. He was very helpful and was a pleasure to deal with on the DLS's.

Happy New Year
 
#12 · (Edited)
sounddeadenershowdown.com has it, you can also get a similar product at Parts Express, but it is a bit thinner. I actually bought the front baffles from an eBay seller. I can look his ID up if you want. The baffles have held up fine for over a year, I am very happy with them.

Excellent write up!! I am impressed, and will give it a full read tomorrow. I'm glad that everything worked out and your install plan seemed to go off pretty hitchless!!

Is that a harbor freight air saw?? I have the same one, if it is :)

Also, those DLS will likely take about 25 hours of burn in time before they are fully broken in.
Harbor Freight FTW! I buy all of my air tools there.

Still playing with the LPF on the subs. Switching between 80 and 125 Hz to see what sounds better. With as litlle as I drive it may be a while before the drivers are broken in. Hate to say it but this is the first time I have had subs so I am still stumbling around in the dark a bit :)
 
#10 · (Edited)
Excellent write up!! I am impressed, and will give it a full read tomorrow. I'm glad that everything worked out and your install plan seemed to go off pretty hitchless!!

Is that a harbor freight air saw?? I have the same one, if it is :)

Also, those DLS will likely take about 25 hours of burn in time before they are fully broken in.
 
#16 ·
Thanks. If anything I am very thorough and believe in putting in the effort to get the results I want. Honestly none of this was very hard, just had to have patience and a vision of how I wanted it to end up.

Not saying this is my first install, but it had been awhile since I had done one and this one was certainly the biggest one I have done.
 
#14 ·
Great write up!!! I'm getting all the "ingredients" needed for sounddeadening trunk, doors, floor and installing 8'' midbass in rear doors so this thread will def help with details.

Got a question thou - why not install tweeters in sidemirror plastic cover?? Unless u REALLY wanted to keep stock look lol.
 
#15 ·
Got a question thou - why not install tweeters in sidemirror plastic cover?? Unless u REALLY wanted to keep stock look lol.
A few reasons:

1) doing this puts the driver side tweeter right in front of your face, throwing off the left/right balance and making the sound very bright (not my preference),

2) without some form of time alignment the large distance between the tweeter and midbass impacts the imaging, you can hear the separation in the drivers and that wasn't what I was looking for,

3) tweeters in the kickpanels places each tweeter almost the same distance from my ears and very close to the midbass, which is a big deal without time alignment,

4) fabrication of new sail panels was not in the plan, if I was to put the tweeters up high it probably would have been in the a-pillars facing each other (with external processing to make it sound acceptable).

Probably my only regret in this was buying the D3 - it looks real nice, the navigation is certainly convenient and the iPod integration is great, but it has very little in the way of sound quality features or "tuneability". If I was starting from scratch and knew what I know now the HU would be a Pioneer 800PRS or an Alpine 9887 running active crossovers. That's the next potential project.
 
#18 ·
Update

Have had the subs running for about a week now and done a bit of fine tuning.

- Comps HP'ed at 100Hz
- Subs LP'ed at 80Hz, subsonic filter at 30Hz
- Rasied the gain on the subs some, they were initially set a bit low

They aren't broken in yet, that will take a couple more weeks, but they really sound good now. They blend seamlessly with the front and have more authority now, I can feel the bass much more.

I'll probably raise the subsonic a bit as these small drivers don't go really low.
 
#19 ·
Nice job!

I am not familiar with the specs for those DLS 8's, but you might want to bring that subsonic filter up to match the FS of the speaker. My guess would be that it is somewhere between 40-50hz. In an IB situation, they are going to be breaking up pretty close to that frequency anyway.
 
#22 · (Edited)
Well, time for an unanticipated upgrade. I was installing a map upgrade to my AVIC-D3 this morning (which I have done a couple of times) and apparently the software upgrade corrupted the SDRAM of the unit which can only be reflashed by a Pioneer Service center (for $200!). Unfortunately without valid navigation software loaded the head unit is completely dead - no sound :banghead: Well at least the weak link in my system is out of the picture, since buying it I always regretted spending that much on the head unit.

So on the surface it looks like a search for a new headunit is on. Seeing I already have the Pioneer BT and XM modules my search will be confined to Pioneer units so that I can reuse these. I'll probably have to see what I can scrape up off of ebay/craigslist for $50 or less that can accept an IP-BUS input and has RCA preouts as an interim solution because I am totally broke at the moment. It's either that or no tunes for at least a couple of months when I hopefully can get something that will be better (high volt preouts, active capabilities).

I am plenty pissed right now about the D3 but also know that things can only get better from here.
 
#25 ·
What you see in that picture is metal tape, not deadener. There is a lot of butyl rope between the baffles and the deck, but no CLD/deadener on the bottom side, all of that is on the top of the deck to reduce the resonance of the panel. All of the visible holes were sealed up from the topside, the ones in those pics had to be sealed from below.

And for an IB setup, yes I think it is important to seal up the holes as much as possible to keep the front wave and back wave of the subs separated.
 
#26 ·
A few notable changes are in the works:

- The AVIC-D3 had it's memory reflashed and was sold to a fellow forum member, right now I for my head unit I am running a Pioneer DEH-P4800MP that nismos14 (thanks again bud!) hooked me up with, I added a Pioneer iPod adapter to the mix. However, in a few days I will be ordering an Alpine CDA-9887 and going active :woot:

- I was planning on putting the Cadence marine amp in my boat, but plans changed and that too was sold. In it's place are 2 USAcoustics amps (from ebay seller "audioclinic" who I recommend highly). A USB-4085 is powering the frontstage with 85w x 4, the subs are being driven by a USB-2080 bridged to 280 watts. The wiring was upgraded to KnuKonceptz Colossus Fleks 4ga to a fused distribution block in the trunk where it splits to an 8ga for each amp. Originally I had a single 8ga running to the trunk. I forgot how much I don't enjoy running power wire through the firewall :(

- Keeping the subs and components I have for now, when I get the 9887 installed I will experiment with the tweeters in the stock dash locations as I will now be able to time align them. That should raise my soundstage, hopefully it will sound good.

Still cleaning up the install and preparing for the 9887. Once it is all done I will post some pics...
 
#28 ·
I really can't imagine going from dd to sd but it does offer more options then your avic had as far as sound goes.
Why? I don't think I am "losing" anything going to a single DIN, I am actually looking forward to it as an upgrade from my perspective. I guess there's some illusion of luxury or convenience with the double din touchscreen, but for what it cost I can buy an awful lot of sound quality.

Put it this way - the proceeds from selling the AVIC-D3 ($425), the Pioneer bluetooth module ($75) and the 4-channel amp ($60) were more than enough to buy the 9887, more amp channels that are more powerful and all the new wiring/hardware. I will get a LOT more sound quality out of the new setup even if I don't run active.

I will say that for me the novelty of the D3 wore off quickly, it looks/works OK and has some nice functions, but I was always trying to figure out what I could add to squeeze more out of it and always regretted spending that much money on a head unit.

At the end of the day I'd rather get a compliment about how good my "cheap" setup sounds rather than talk about the head unit (if I didn't use an iPod I probably would have been looking at a head unit that you would think of as very ancient and basic). I guess my knowledge/experience/expectations grew and I quickly realized that the D3 wouldn't be what I wanted it to be without adding stuff like external line drivers and crossovers. This way is dead simple - HU, 2 amps, 2-way frontstage and subs.

FYI anyone who is interested I will have a virtually new Pioneer CD-IB100II ip-bus iPod adapter up for sale in the next week or so. I also have a Pioneer GEX-P920XM adaptor that has received free XM for the 18 months I have owned it (I purchased it as a factory reconditioned unit), those will both be coming out with the Alpine install. Not sure if I am going to sell the XM box though, it may be gifted to a friend or family member if I can find one with an ip-bus Pioneer head unit.